Disbursements
How transfers work
In a nutshell
Understand the lifecycle, approval stages, statuses, and webhook events behind Paystack transfers.
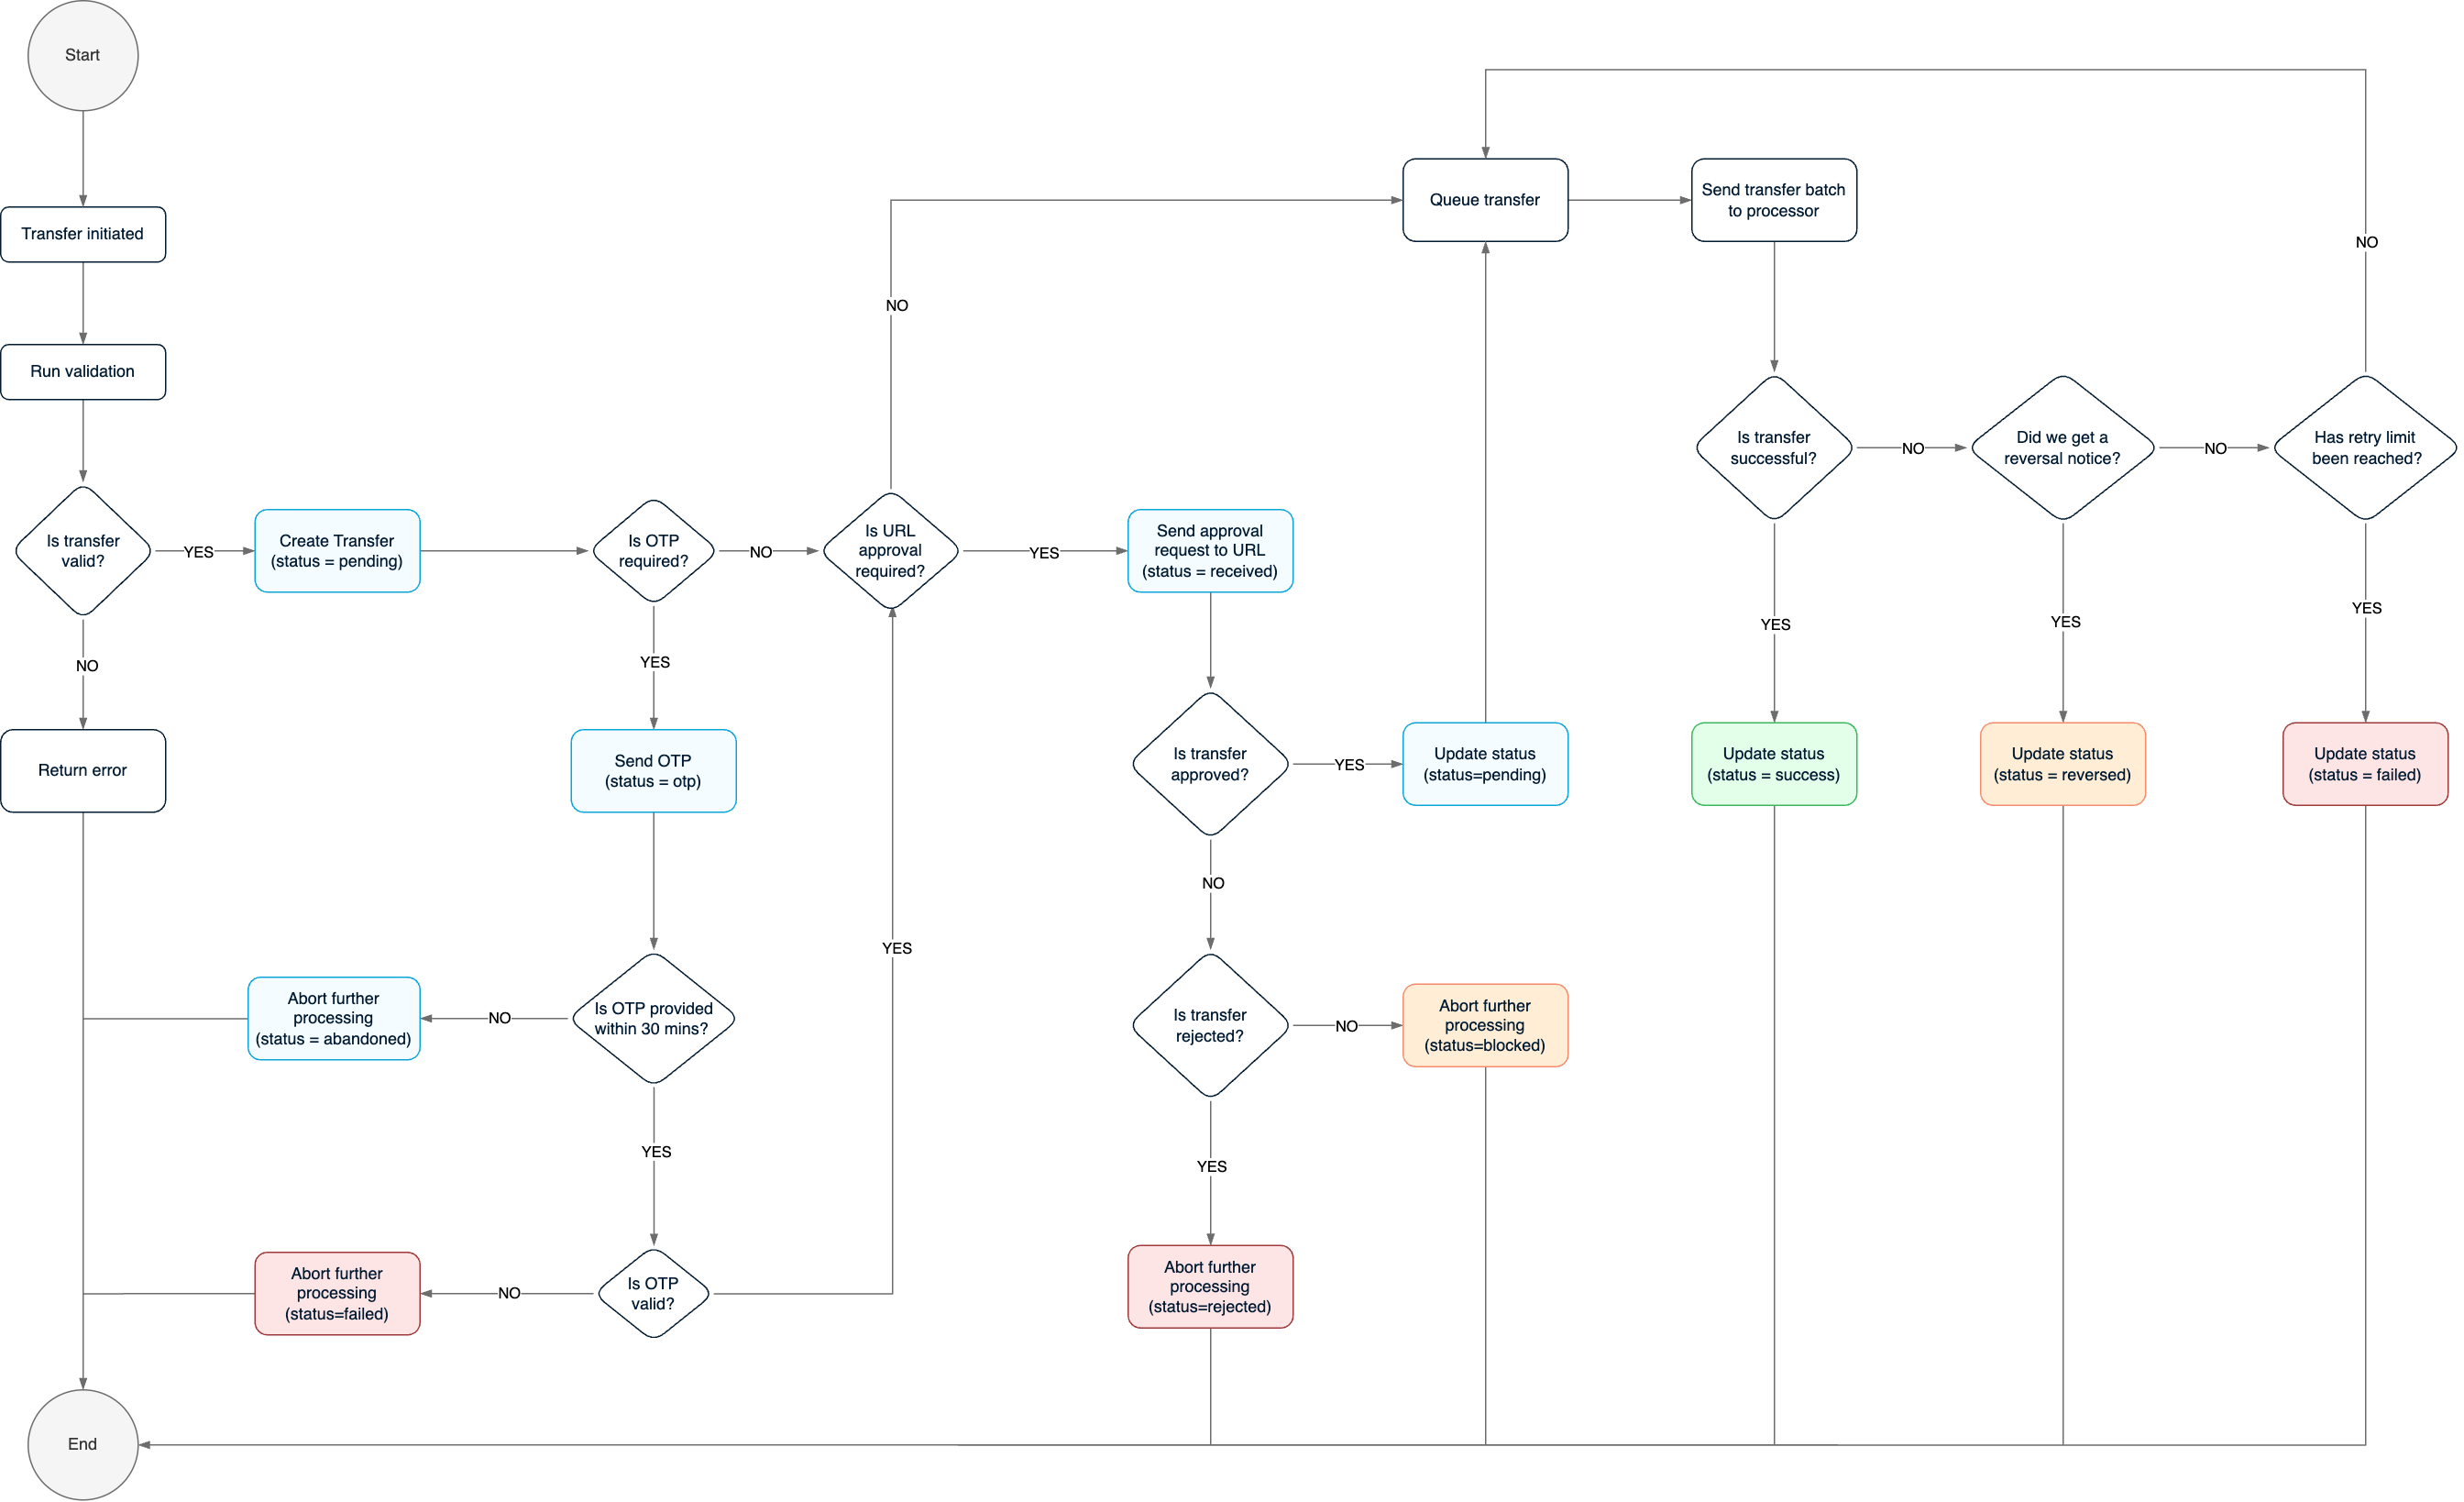
When a transfer request is initiated, it goes through a sequence of processes:
- Request validation
- Transfer creation
- Approval checks
- Queue transfer
- Await processor
Each process determines the status of a transfer at a particular time. When a transfer has been created, its status can be gotten from the data.status parameter. The meaning of each status is described in the table below:
| Status | Meaning | Conclusive? |
|---|---|---|
pending | Transfer is being processed. | No |
success | Transfer has been successfully processed. A successfully processed transfer doesn’t equate to instant credit to the customer. | Yes |
reversed | Transfer couldn’t be processed. Typically, this means the customer’s bank is unable to receive money at that moment. The transfer amount is returned. Merchant can retry the transfer later. | Yes |
failed | Transfer couldn't be processed. This typically happens when the processor is down. You can retry again. | Yes |
otp | The transfer requires an addition approval step before processing can continue. OTP is sent to email and/or phone number. | No |
abandoned | This happens when OTP isn't provided within 30 mins. Transfer won’t be processed afterwards. | Yes |
blocked | This happens when the merchant’s server fails to perform either an approval or rejection on the transfer request. | Yes |
rejected | This happens when the merchant’s server declines a transfer request. | Yes |
received | A transfer has this status when it requires approval from the merchants server and the approval request has been sent. | No |
A conclusive status is one in which no further action can be performed on. When a transfer has a conclusive status, it means we're done processing such a request.
Avoiding double credit
Before retrying a transfer, ensure you’ve gotten a conclusive status. If you’ve not gotten a conclusive status for a particular transfer and need to retry, you should use the same transfer reference.
Copy linkRequest validation
At this point, we run a series of checks on your integration to ensure you are able to make a transfer. The checks include:
- Business type: We check if your business is a starter business or a registered business. Only registered businesses are allowed to use the transfer feature. Starter businesses can be upgraded to a registered business to use the transfer feature.
- Payout on hold: An integration payout might be on hold for different reasons. Transfer can't be processed when payout is on hold.
- Invalid amount: An amount is invalid if it’s below the minimum transfer amount or above the maximum transfer amount. You should confirm the allowable transfer amount before making a transfer request.
- Recipient validity: This check is to ensure the recipient code and details are valid.
- Balance sufficiency: Before a transfer can be performed, we check if you have the transfer amount plus the transfer fee in your Paystack balance.
If any of the validation checks fails, we return an error message with the cause of the error.
Transfer not found
If you call the Verify Transfer endpoint at this stage, you’ll get an error because the transfer hasn’t been created. This is why you should rely on webhooks for updates.
Copy linkTransfer creation
On a successful request validation, we need to create a DB entry for the request. To create an entry, we require a transfer reference which is going to be used to keep a track of the transfer lifecycle. If a transfer reference isn’t provided, we go ahead to create one. Else, we use the transfer reference you provided. The transfer is then added to the DB and it’s status set to pending.
At this stage, we also deduct the transfer amount and the transfer fee.
Generate your transfer reference
Always generate a transfer reference in order to track, manage and reconcile each transfer. Check out how to Generate a transfer reference section to learn more.
Copy linkApproval checks
There are two types of approval that can be used to secure a transfer request:
- OTP: This is a code we send to the merchant’s email and/or phone to confirm that the request was initiated by the merchant.
- URL: OTP approval requires manual intervention which could be tedious for certain use cases. With URL approval, a merchant creates a verification endpoint that's used to confirm the authenticity of the transfer. For each transfer request, we send an approval request to the merchant’s server to confirm further processing.
As an extra level of security, a merchant might have turned on either or both approval steps. We do a check to confirm is OTP is required or not. If OTP is required, we send an OTP to the merchant’s email and/or phone and set the transfer status to OTP. If the OTP isn’t received or used within 30 minutes, we mark the transfer as abandoned. If the merchant puts in the wrong the OTP, we mark the transfer as failed.
After the OTP process, we check for the URL approval. When we send an approval request to the merchant’s approval URL, we set the transfer status to received while we await a response. The merchant’s server approves or rejects the transfer, or we mark it blocked if it doesn't respond in time. See Server approval for the response codes and resulting statuses.
Copy linkQueue transfer
Transfers are added to a queue for multiple reasons. The two primary reasons include:
- Conforming to the processor’s requirements
- Resilience
Transfers in the queue are removed in batches and sent to the processor. If we're unable to get a definite response (success, failed, reversed) from the processor, we add the transfer back to the queue. We keep trying until we reach our retry limit. At this point, we mark the transfer as failed. We send a transfer.failed event via your webhook URL.
Copy linkAwait processor
The processor is in charge of pushing the transfer to your customers. They make the request to the customer’s bank to credit the customer’s account. If the processor is able to credit the customer’s account, a successful response is sent back. This is propagated back to your integration via the transfer.success event. If we're unable to get conclusive feedback from the processor, we keep retrying till we hit our retry limit. At this point, we mark the transfer as failed and send the transfer.failed event.
Sometimes, the processor might send a reversal notice due to their inability to credit the customer’s account. When we get this notice, we send a transfer.reversed event and credit your Paystack balance back.
If a transfer fails validation or stays in an unsuccessful status, see Troubleshooting.