Disbursements
Transfer approval
In a nutshell
Approve transfers with OTP, turn OTP off for automated payouts, and confirm each transfer with your own approval URL.
Paystack can hold a transfer until it's approved, so an exposed API key or a mistaken server action doesn't immediately turn into a payout. You can approve transfers in two ways:
- OTP: Paystack sends a one-time password to the business owner, who enters it to release the transfer.
- Approval URL: Paystack sends each transfer to an endpoint on your server, which approves or rejects it automatically.
OTP needs a person for every transfer, so it doesn't fit automated payouts such as payroll or vendor settlements. Disable OTP before you use bulk transfers. If you still want an approval step after you disable OTP, use an approval URL.
Copy linkOTP approval
As an additional layer of security, a Paystack business owner might want to confirm a transfer by using the One Time Password (OTP) sent to their device.
If you have OTP enabled on your Paystack Dashboard and you initiate a transfer via the API, you get a response with message: Transfer requires OTP to continue and data.status: otp
{
  "status": true,
  "message": "Transfer requires OTP to continue",
  "data": {
    "reference": "acv_9ee55786-2323-4760-98e2-6380c9cb3f68",
    "integration": 463433,
    "domain": "test",
    "amount": 100000,
    "currency": "GHS",
    "source": "balance",
    "reason": "Bonus for the week",
    "recipient": 56824902,
    "status": "otp",
    "transfer_code": "TRF_vsyqdmlzble3uii",
    "id": 23070321,
    "createdAt": "2025-08-04T10:32:40.000Z",
    "updatedAt": "2025-08-04T10:32:40.000Z"
  }
}
When the business owner supplies the OTP sent to their mobile number (and email if enabled), the transfer can be completed by using our Finalize TransferAPI endpoint:
POSTapi.paystack.co/transfer/finalize_transfer
curl https://api.paystack.co/transfer/finalize_transfer \
  -H "Authorization: Bearer $PAYSTACK_SECRET_KEY" \
  -H "Content-Type: application/json" \
  -d '{
    "transfer_code": "TRF_vsyqdmlzble3uii",
    "otp": "928783"
  }' \
  -X POST
const https = require("https");
const params = JSON.stringify({
"transfer_code": "TRF_vsyqdmlzble3uii",
"otp": "928783"
});
const options = {
hostname: "api.paystack.co",
port: 443,
path: "/transfer/finalize_transfer",
method: "POST",
headers: {
Authorization: `Bearer ${process.env.PAYSTACK_SECRET_KEY}`,
"Content-Type": "application/json",
},
};
const req = https.request(options, (res) => {
let data = "";
res.on("data", (chunk) => {
data += chunk;
});
res.on("end", () => {
console.log(res.statusCode, JSON.parse(data));
});
});
req.on("error", (error) => {
console.error(error);
});
req.write(params);
req.end();<?php
$fields = [
"transfer_code" => "TRF_vsyqdmlzble3uii",
"otp" => "928783",
];
$curl = curl_init();
curl_setopt_array($curl, array(
CURLOPT_URL => "https://api.paystack.co/transfer/finalize_transfer",
CURLOPT_RETURNTRANSFER => true,
CURLOPT_ENCODING => "",
CURLOPT_MAXREDIRS => 10,
CURLOPT_TIMEOUT => 30,
CURLOPT_HTTP_VERSION => CURL_HTTP_VERSION_1_1,
CURLOPT_CUSTOMREQUEST => "POST",
CURLOPT_POSTFIELDS => json_encode($fields),
CURLOPT_HTTPHEADER => array(
"Authorization: Bearer " . getenv("PAYSTACK_SECRET_KEY"),
"Content-Type: application/json",
"Cache-Control: no-cache",
),
));
$response = curl_exec($curl);
echo curl_getinfo($curl, CURLINFO_HTTP_CODE) . " " . $response;
?>If the OTP isn't used within 30 minutes, the transfer is marked abandoned. If you rely on OTP, turn on both the email and phone channels to improve delivery.
Copy linkDisable OTP
Turn OTP off when your server initiates transfers without a person in the loop. You can do this from the Dashboard or with the API.
Warning
Disabling OTP removes the manual check before money leaves your balance. Only do it when your transfer initiation flow is secured with strong secret management, access control, and audit logging, and consider adding an approval URL.
Copy linkFrom the Dashboard
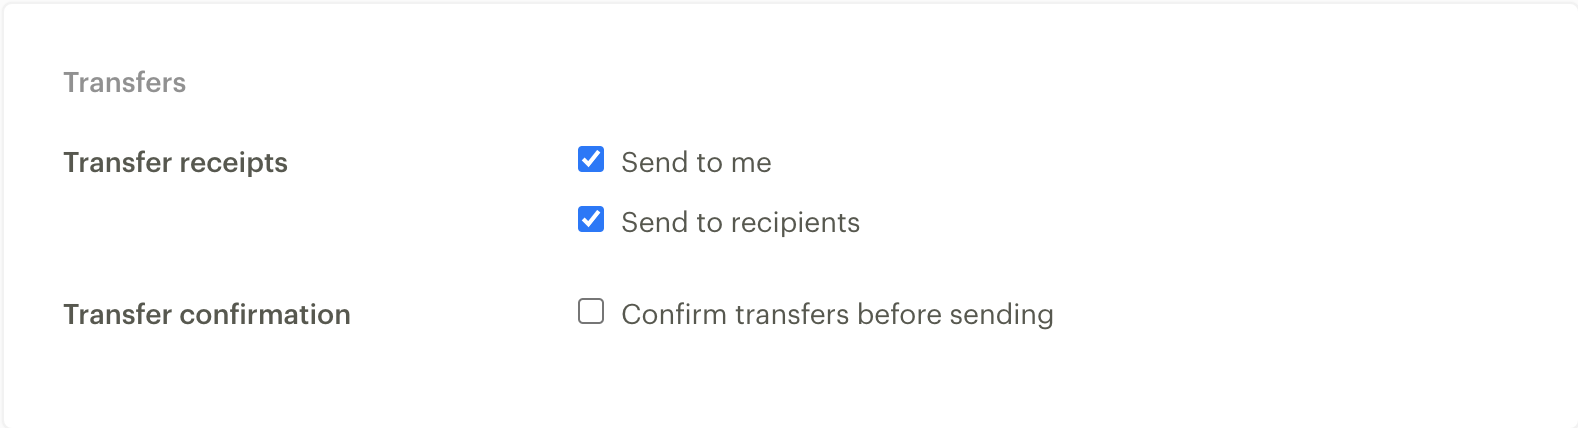
Go to Developers → Transfer approvals on the Paystack Dashboard and uncheck Confirm transfers before sending:
Copy linkWith the API
Turning OTP off is itself protected by OTP, so it takes two calls:
- Call Disable OTPAPI. Paystack sends an OTP to the business owner.
- Call Finalize Disable OTPAPI with that OTP to complete the change.
To turn OTP back on, call Enable OTPAPI. Transfers you initiate afterwards require OTP approval again.
Copy linkServer approval
OTP approval doesn’t allow you to build a fully automated system. However, this shouldn’t prevent you from confirming the authenticity of transfer requests. This is where the server approval comes in. It allows you to create a URL that checks that a transfer request was initiated by you. It’s a two step process:
- Create an approval URL
- Add URL to dashboard
Copy linkCreate an approval URL
The approval URL is a POST endpoint that checks the authenticity of transfer details. If the transfer details are authentic, it should respond with a 200, else a 400:
| Response code | Meaning | Status |
|---|---|---|
| 200 | Transfer approved | pending |
| 400 | Transfer rejected | rejected |
If the merchant server doesn’t respond within a few seconds, we mark the transfer as blocked and stop further processing.
Avoid long-running task
You should ensure your approval URL isn’t running long processes. This could lead to a delay in response time that causes transfers to get blocked.
// Using Express
function validateTransferRequest(request) {
  // validation logic
}

app.post("/approval", (req, res) => {
  const { body } = req;
  const isValidTransferRequest = validateTransferRequest(body);

  if (!isValidTransferRequest) {
    return res.status(400).json({});
  }

  return res.status(200).json({});
});
<?php
function validateTransferRequest($request)
{
  // validation logic goes here
  return false; // update line based on logic
}

// Retrieve the request's body and parse it as JSON
$input = @file_get_contents("php://input");
$payload = json_decode($input);
$isValidTransferRequest = validateTransferRequest($payload);

if (!$isValidTransferRequest) {
  return http_response_code(400);
}

return http_response_code(200);
?>
We add the payload used to initiate the transfer request when we send an approval request. When validating a request, your validation logic should confirm that the transfer reference and amount from the payload matches what you have on your system.
Copy linkAdd URL to dashboard
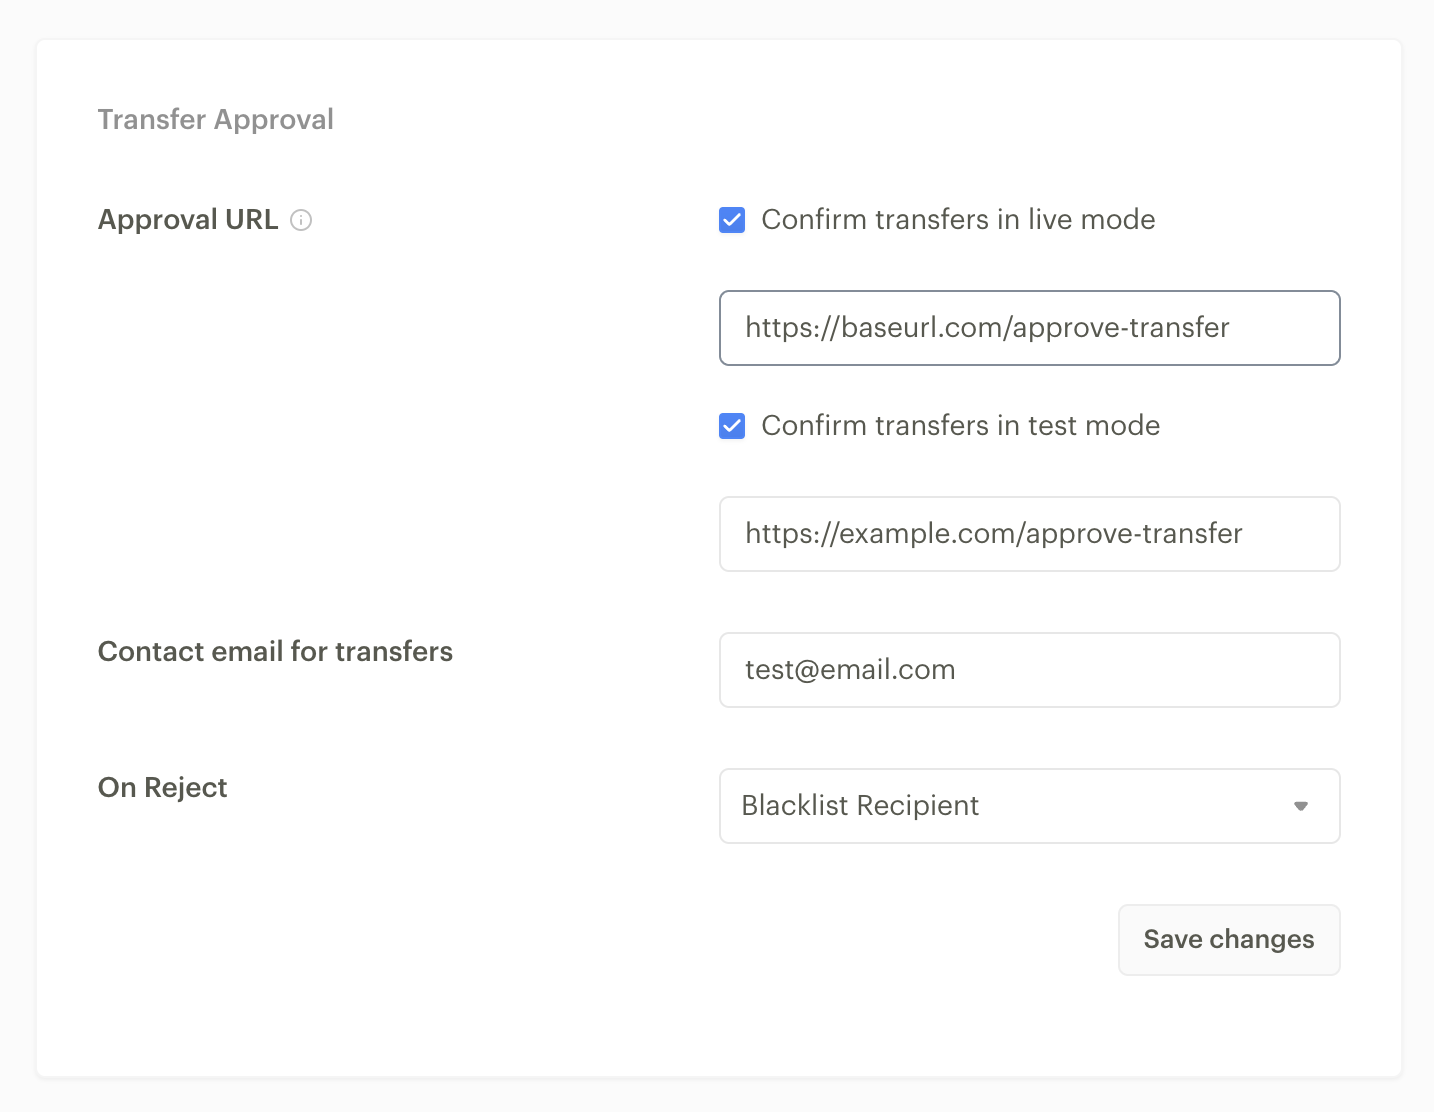
When you are done with the implementation of your approval URL, you need to add the URL to the Paystack Dashboard. To do this, go to Developers → Transfer approvals on the Paystack Dashboard:
Save changes
Don’t forget to hit the Save changes button to finalize the setup process.
In the Transfer Approval section, check the box for the domain you want to activate the approval for, then add the URL for the domain. There are two actions available when you reject a request:
- Blacklist Recipient: When you blacklist a recipient, you would no longer be able to send money to the recipient. You can undo this from the Dashboard by navigating to the Transfer recipients page, clicking on the recipient and toggling the switch.
- Do Nothing: We just won’t continue processing the request.